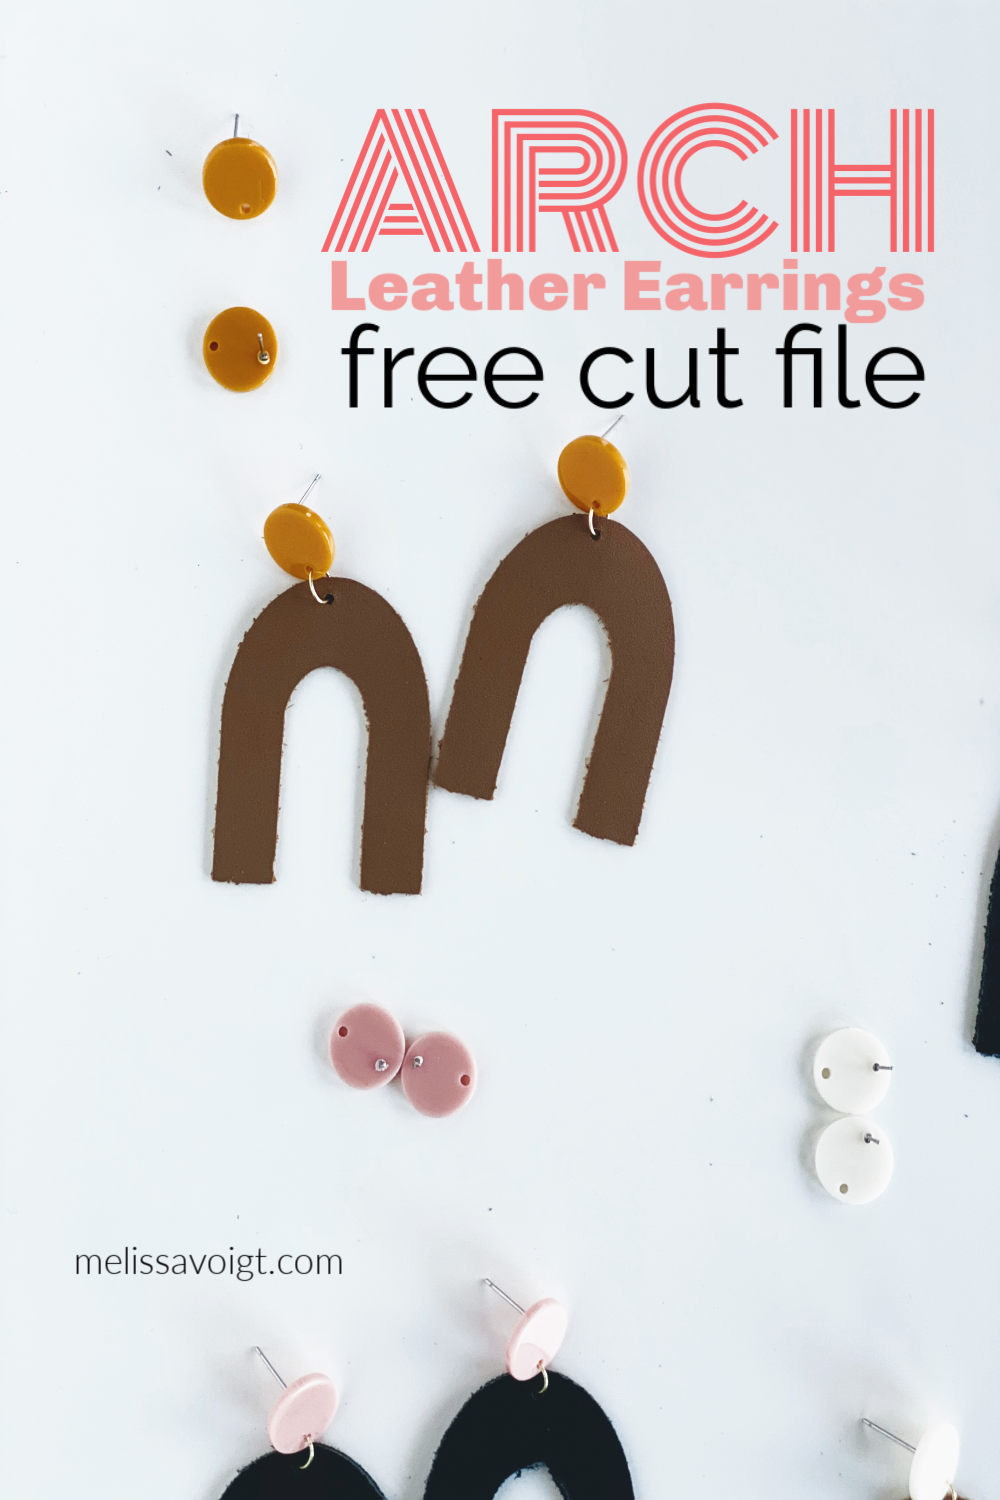

CREATE YOUR OWN ARCH LEATHER EARRINGS WITH AN POST WITH OUR FREE SVG CUT FILE
Horseshoe earrings, sometimes called Arch earrings, are gaining in popularity. They are unique and bold. Most of the time, you’ll see them make with clay but you can also make this style of earring with leather and your Cricut Maker.
We made arch styled leather earrings here. It is a basic look and super easy to create but I wanted to show you how versatile this one cut file can be. You can make hundreds of different kinds of arch earrings with this one file. Browse Etsy for some inspiration and create!
I love the arch earring with a post. I’ve been thinking about making some for a while. I love this shop for great acrylic jewelry finds. I grabbed some fun earring posts, cut leather with my Cricut Maker, and made some great leather earrings! They are inexpensive to create and stunning to wear!
If you want to learn about how to make more leather earrings with your Cricut Maker check out our Teardrop cut file tutorial here, our Open Teardrop tutorial here, our Circle with a cutout tutorial here, and our Joanna Gaines inspired folded leather earring here.
You can find all our DIY TUROIRALS HERE.
LET ME SHOW YOU HOW I MAKE DIY ARCH LEATHER EARRINGS WITH A POST

This post contains affiliate links which means I receive a small commission at no extra cost to you. If you make a purchase using this link.Cricut Maker. You can use a Cricut Explore Air 2 for this as well.
Arch SVG/PNG cut file from my free resource library. You can get access to this file at the bottom of this post.
HOW TO MAKE ARCH LEATHER EARRINGS WITH A POST USING OUR FREE CUT FILE

STEP 1 DOWNLOAD MY CUT FILE
Download my free arch or horseshoe cut file from my resource library. You can get access to my resource library at the bottom of this post. My resource library is full of cut files you can use on your Cricut Maker.

STEP 2 UPLOAD AND EDIT THE CUT FILE TO CRICUT DESIGN SPACE
Upload the arch cut file into Cricut Design Space. If you have never uploaded a file into Cricut Design Space, you can check out my tutorial here.
You can upload the arch file for FREE and then cut. It is really easy to once you get the hang of it. Feel free to reach out to me if you have any questions or problems.
Once your file is uploaded, your screen should look like this.

Next, you will need to size your earrings In the upper middle of your screen, you’ll see “SIZE”. This is where you can make your arch big or smaller. I recommend the following size.
1.5” Wide X 2” Long
Finally, you will want to duplicate your earrings so you have 2 earrings to cut. Note: if you want to make multiple pairs of earrings at one time, duplicated as many as you need! You can fill out the entire 12 x 12 mat if you want.
To do this simply click on your arch earring. On the upper right side of your screen, click “DUPLICATE.”
You now have 2 earrings. Your design should look like this.

STEP 3 CUT YOUR LEATHER
Cutting Cricut Genuine Leather is a great place to start if you’ve never worked with leather on your Cricut. Be sure to place your Cricut Genuine Leather FACE DOWN on a strong grip mat.
Use can use a brayer to ensure your leather has fully adhered to your mat.
Place a deep point blade in your machine and move the star wheels to the right.
If you need more help cutting Cricut Genuine Leather, check out all my tips to cutting Cricut Genuine Leather here.
STEP 4 PUNCH HOLES IN YOUR ARCH LEATHER EARRINGS
I prefer to cut holes in my leather earrings with a leather punch. I love my leather punch.
You could measure the exact middle of your earring and cut OR you could simply fold your earring in half (see below).

Once your earring is folded in half symmetrically, line up your punch.
I find a leather punch gives you more control. My punch has several different sizes of holes. I always set my dial on the smallest hole when making leather earrings

STEP 5 ATTACH YOUR EARRING TO YOUR POST
For this earring, you need to attach your post to your leather earring. It is really simple to do.
Open your jump ring. I used an 8mm jump ring for this earring. Be sure to open it wide enough that you can thread it through your earring AND your post.

2. Thread the jump ring through your leather earring first.
3. Next, thread your jump ring through your post so that now your leather earring is connected to your post.
4. Using your jewelry pliers, close your jump ring. Your earring should be secure. Repeat with the other earring!

Secure your new earrings on your ears with earring posts back. I bought my posts from Etsy. Play around with colors with this one! You could make so many combinations!